What was new in previous versions
What was new in previous versions BruceMacaos Enterprise 5.5 (June 2021)
Macaos Enterprise 5.5 (June 2021) BruceTest Fixture improvements
Macaos Integrated Test Jig
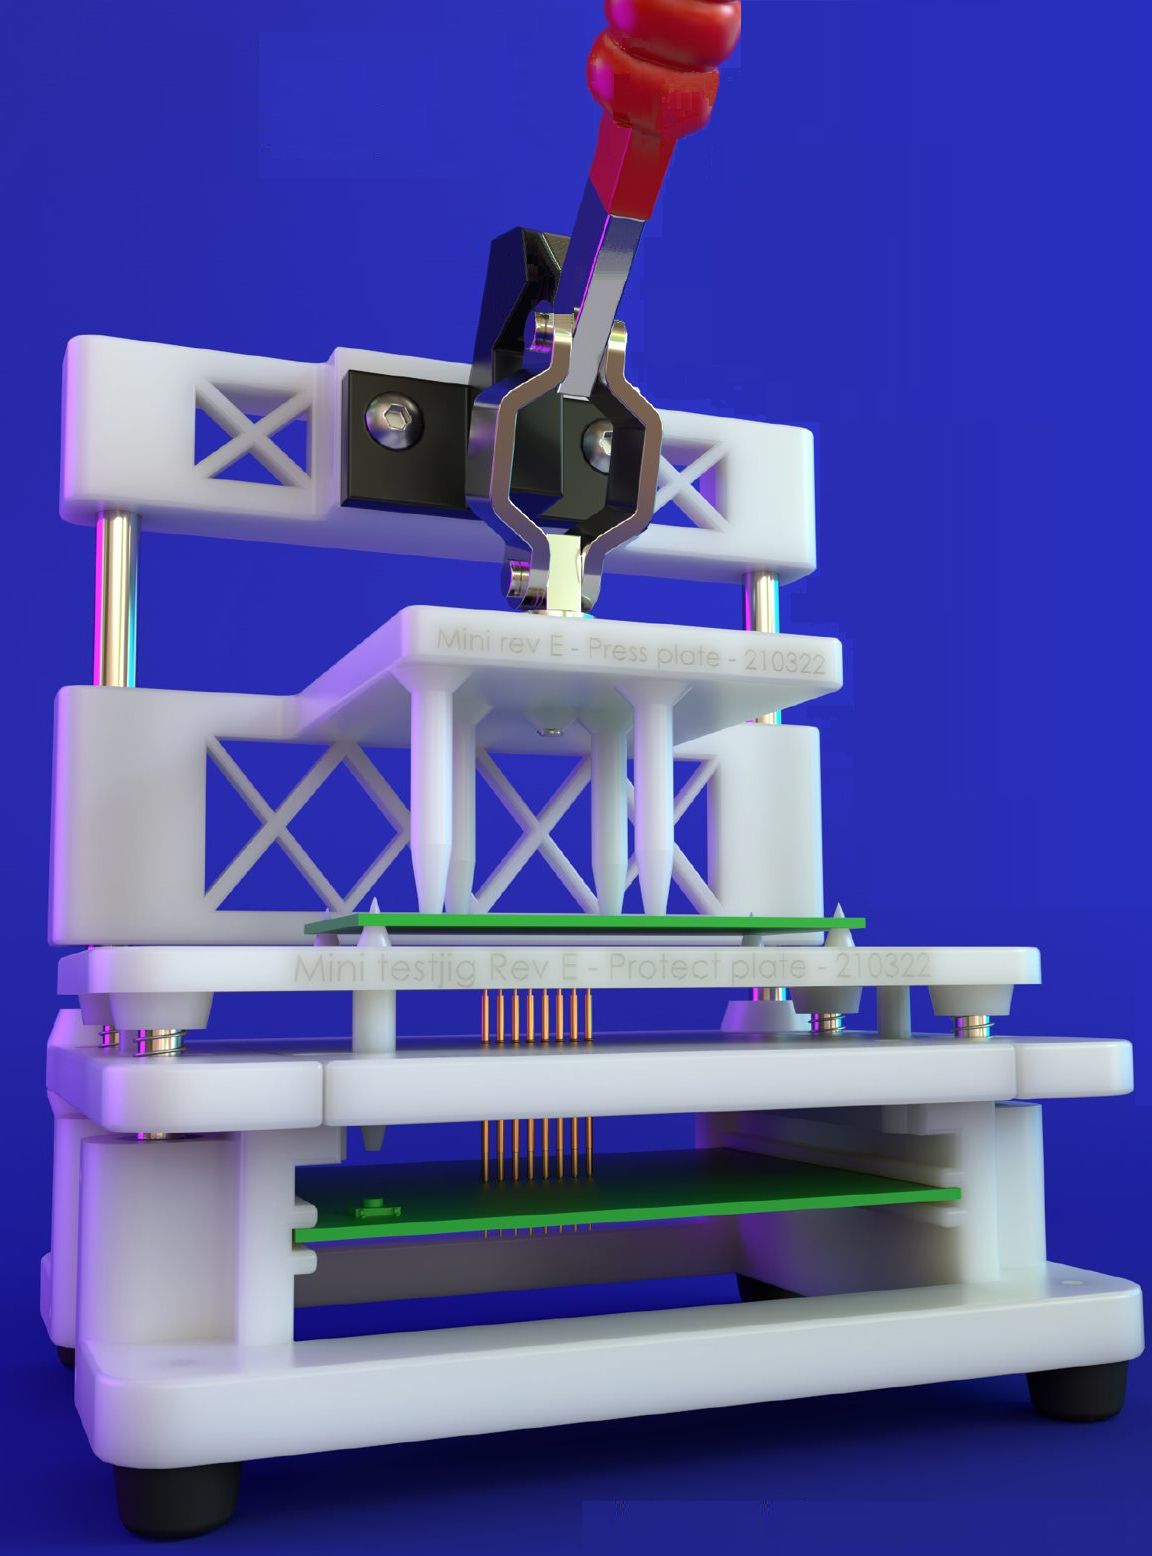
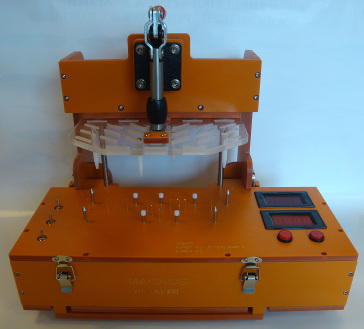
The test fixture designer module now supports design of the Macaos Integrated Test Jig, a new design which integrates test circuitry into a modular test jig. It is developed for increased reliability and ease of design, compared to other supported test jigs.
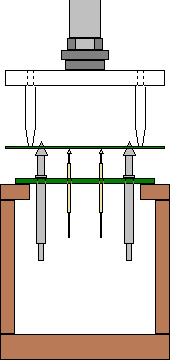
The Macaos Integrated Test Jig incorporates an upper press fixture, a protective cover, a receptacle plate, and a test circuitry PCB. This is delivered fully assembled, with pins/receptacles installed.
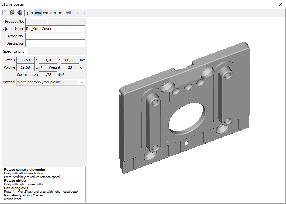
The user selects an active area size, and then specifies the locations and types of Guide Pins and Test Pins. From this information, the Upper Fixture, Protective Cover and Receptacle Plate (the three gray modules shown at the right) are generated and added to the jig.
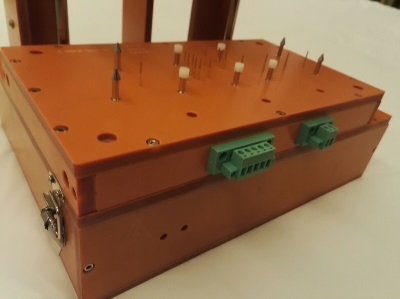
Use the Gerber button to generate a Gerber file of the test circuitry PCB outline and pin locations, for import to your CAD system. Connectors and indicators may be placed at the front and/or back edge of the PCB. This PCB must be ordered together with the test jig.
Automatic test pin placement
Test points that have been defined in the Assembly Data Manager (with the Test Point component class) may be automatically imported as test pins. The user need only specify a receptacle size (diameter) and pin head style.
Other tweaks
When publishing a test fixture, it is now possible to attach a STEP file (3D model) of the PCBA to be tested. This is strongly recommended when publishing a Macaos Integrated Test Jig.
As test pins are added to the fixture, the centroid of the test pins is shown as a hexagon.
Assembly Data Manager improvements
We have made additional tweaks to streamline ADM usability. Our goal is to make the process of verifying PnP and BOM data as quick and painless as possible. Here's a list of the tweaks:
BOM Import
- If designators are separated by a comma, semicolon, or space, the separator character will be automatically identified in most cases.
- An option has been added to treat the hyphen (-) as a valid designator character, instead of treating as a designator range character.
- Up to three Value columns (in the source grid) may be specified.
- If desired, all capacitors and/or resistors may be marked as "equivalent or better" during import.
- Right-click on a column to search and replace text in the selected column.
- A button has been added to clear all BOM import configuration settings.
Other tweaks
- The shortcut key for opening the component search dialog has been changed from Ctrl+O to Ctrl+D in order to make it easier to use with only the left hand.
- Additional commands have been added to the right-click menu of the component tree, to remove approval state, remove alternate manufacturer part numbers, and more.
Macaos Enterprise 5.4 (February 2021)
Macaos Enterprise 5.4 (February 2021) BruceProduct Browser improvements
 Recent Activity
We have added a Recent activity list, which lists the most recent events related to your company. For each event, you can click on the product number to view the product in the browser, or click on a document number to view the document details. The supported events are:
- Product published
- Quotation
- Request for quotation
- Order placed
- Order shipment
Other tweaks
A new Has assembly info folder has been added to the My products group of folders. This folder includes any product marked as having PnP or BOM data attached.
If you have products that you wish to delete from Macaos Enterprise, you may use the Remove from all folders (make dormant) command. This will prevent the product from being listed in the product browser for all users. The product may be restored, if necessary, by locating it with the View|List dormant products command.
Panel module improvements
Panel scripts
The panel script feature has been expanded to support fixed size frames, as well as scripts which only add frame objects to an existing panel. If desired, board rotation in a best fit script may be disabled.
It is now also possible to add text or a bar code to a panel script. You may specify any text, or right-click on the text field to insert the product number, name, article number, description or date of panelization.
 Add board as a test coupon
Any (small) board may be added to the panel frame as a coupon. By default the Board as coupon chooser allows you to select boards with width or height small enough to fit in the panel frame. For each layer in the panel, data from the board is copied to the desired location in the frame.
Other tweaks
A notch may be added to the panel frame by placing a tooling hole or slot at the edge of the frame.
Diamond and octagon have been added to the available shapes for fiducial marks.
When placing an impedance coupon, if the frame width is too small for the coupon you may choose to automatically enlarge the width of one or more frame sides to accommodate the coupon width.
Import module improvements
When importing an archive which contains both Gerber/Drill and ODB++ data, the user may choose which dataset to import. (The other dataset will be ignored.)
Layers have been added for Beveled edge, Coating top and Coating bottom.
It is now possible to mark drill tools as countersink. This is done in the same manner as for marking drill tools with via protection or as press-fit holes.
Assembly Data Manager improvements
We have made numerous tweaks to streamline ADM usability. Our goal is to make the process of verifying PnP and BOM data as quick and painless as possible. Here's a list of the tweaks:
ADM module
- New shortcut keys: Ctrl+Z=zoom to component; Ctrl+E=enter edit mode; Ctrl+S=save and exit edit mode
- Ctrl+Click on component in viewer (to see component properties) works when in Move mode (but not other graphic modes)
- BOM Placement list sorted in same order as component tree
- Added Viewer button beside BOM list buttons in toolbar
Add component/Add fiducial
- When adding a component, you may copy properties from the component selected in the component tree
- Warn if specified designator is a duplicate and show alternatives
- After adding a component or fiducial, the module remains in add component or add fiducial mode
- Does not reload view if focused component's layer is already visible
 Component tree
- Filter list by designator
- "All approved" icons at parent level(s)
- Value or OrigDescr is shown in the tooltip of Component level items
- Hide approved components
- Buttons to expand or collapse all levels of tree
- Added Mechanical, Fuse, and Crystal component styles
- Set Equivalent or Better for selected components
- Set or remove Include in PnP Output for selected components
- Set zoom size for double-click on component
Component editor
- Check box for Allow Equivalent or Better
Import BOM
- Add column to source grid
- Edit text in selected cells (both grids)
- Edit text in all cells of selected column (both grids)
- Specify default mounting style when no column mapped for mounting style
Other improvements
A major change in this release is under the hood. We have increased the resolution of our internal database from 100 nm to 1 nm. Among other things, this will greatly reduce round-off errors in determining the center of arc objects.
Mechanical parts: It is now possible to choose Other material (see specification) and enter the material description in the Spec field.
User manager: We've added action buttons to the User manager, to make functionality more visible.
Viewer: When measuring, the angle from start to end point is also displayed.
Macaos Enterprise 5.3 (August 2020)
Macaos Enterprise 5.3 (August 2020) BruceAssembly Data Manager (ADM)
The new Macaos ADM is an integrated BOM Tool and Pick and Place Data Manager for PCBs. It provides an environment for managing and reviewing Pick and Place (PnP) and Bill of Materials (BOM) data.
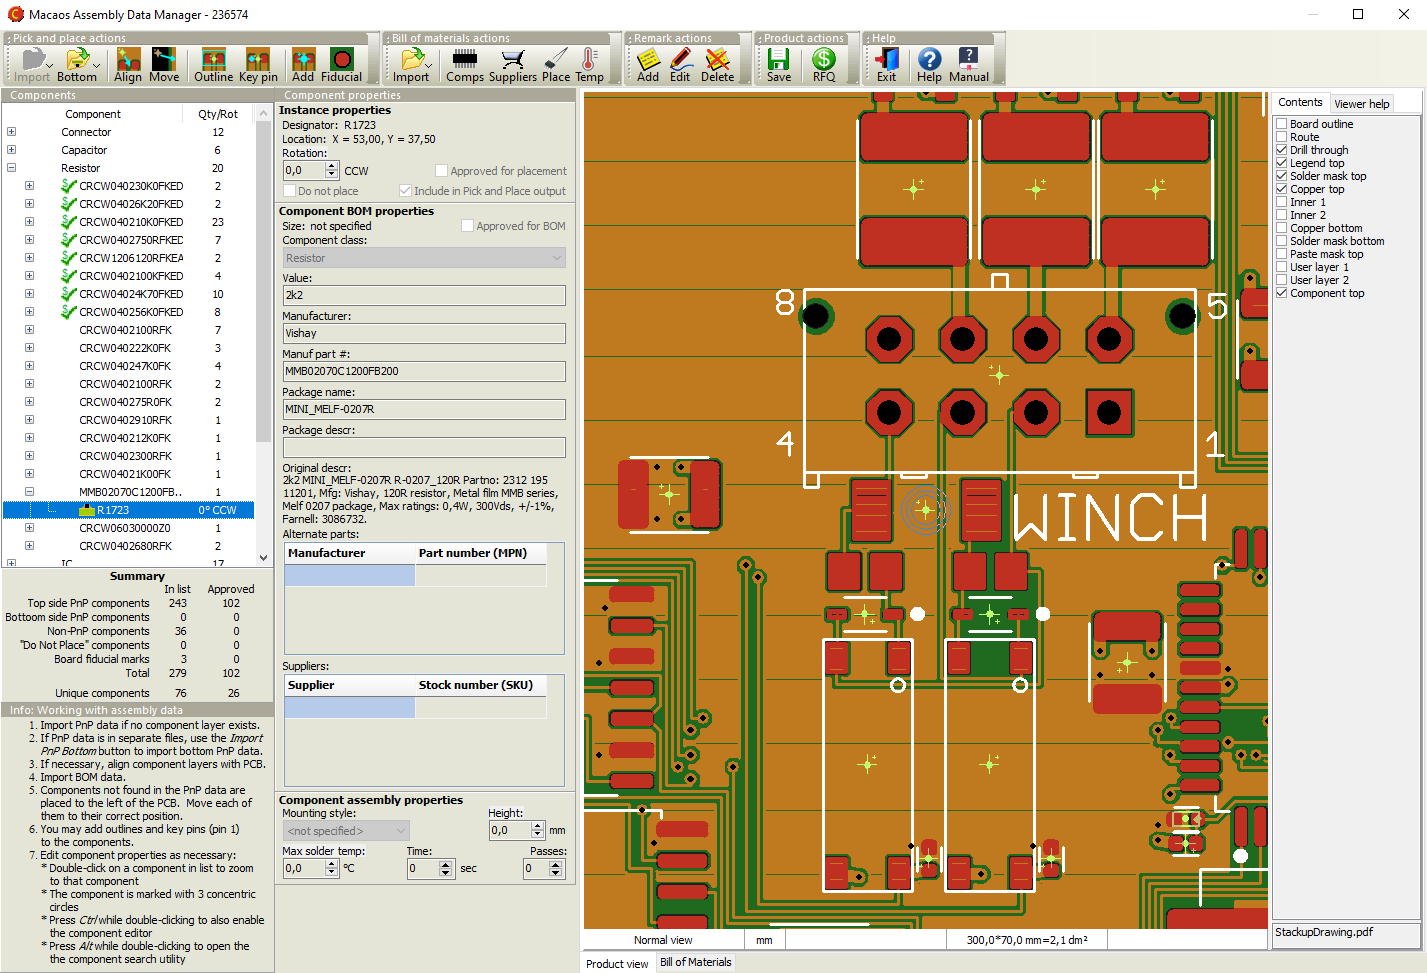
The ADM helps dramatically reduce time and effort in preparing assembly data, by combining the following features in a single module:
- Graphic viewer with component editing functionality
- Structured component overview with properties editor
- Component search facility
- Send RFQ for assembly to participating EMS providers (Basic version only)
- Component price estimator (Pro version only)
- Component rotation, height and solder temperature editor
- Export PnP and BOM data (Pro version only)
The ADM makes use of the recently released X3 extensions1 to the Gerber Format to combine PnP, BOM and Assembly Drawing data into an integrated component layer of a PCB product. As CAD systems2 implement these extensions, a rapid and error-resistant path from designer to manufacturer may be achieved.
The component layer displays the location, rotation, size and key pin location of each component together with properties such as manufacturer part number, supplier SKUs, height, max solder temperature, etc. The use of a standards-based structure for this information allows purchasers, supplers, process line operators, etc to automate their systems and thereby reduce costs.
1 Macaos actively participates in the development of these standards.
2 Some CAD systems, such as kicad, already support Gerber X3 output.
See the ADM user guide for more info.
Mechanical parts
When selecting the paint color for a mechanical part, it is now possible to specify exactly specify the color as RAL, NCS, RGB or HSL.
It is now possible to easily attach additional files, such as a STEP file or additional specification documents, to a mechanical part product.
Stencil module improvements
The stencil module now calculates the Aspect ratio and Area ratio for the smallest apertures in the stencil. This is used to recommend a maximum stencil thickness when creating a stencil. See Stencil ratios for more info.
DXF file import
Limited support for importing DXF files has been added. A DXF file may be imported to a user layer in the Import module. When loading a file directly in the Stencil module, you may load either a Gerber file or a DXF file.
Only those DXF entities which easily map to Gerber-style objects are imported. Other entities are ignored. For more info see DXF Files.
Other improvements
The biggest change in this release is under the hood. We have enhanced our Gerber reader and writer to be fully compliant with all features of the latest Gerber Format standards. This improves data reliability from your CAD system all the way to the manufacturing processes.
Macaos Enterprise 5.2 (November 2019)
Macaos Enterprise 5.2 (November 2019) BruceCreate wave solder pallets
With this new module, you can quickly design a pallet for transporting a board or panel through a solder wave. Solder pallets are useful when working with small, thin or irregular boards, as well as with boards that have both PTH components and solder-side SMT components.

Two styles of pallets are supported:
- A wave solder pallet exposes the entire board to the solder wave.
- A selective wave solder pallet exposes only specified regions of the board to the solder wave.
Creating a selective wave solder pallet is easy:
- Select a material and thickness and specify component pocket depths.
- Place board fasteners at desired locations around the board.
- Draw "opening" outlines around the components to be soldered.
- Draw "pocket" outlines around the solder-side components that are covered by the pallet.
- Generate a milling file for the pallet.
All other elements of the pallet are calculated automatically. This includes edge rails, bottom side bevels, pallet floor, seal walls, etc.
Creating a wave solder pallet is even easier, since steps 3 and 4 above are unnecessary.
Note: Selective wave soldering requires some planning during board layout, in order to have sufficient clearance between wave-soldered components, and components which must be shielded from the solder wave.
PCB as test fixture
 The Test Fixture Designer module has been expanded to allow creating a PCB test fixture.
Rather than using a sheet of fixture material as a holder for the test pins, it may sometimes be more useful to mount the test pins directly into a PCB.
For a standard test jig, choose Lower w/ PCB. For other jigs, choose Lower - flat and set the thickness to 3.2.
Use the Gerber button to export the fixture outline and holes to a Gerber file, which may then be imported to your CAD system for further design.
Import module improvements
PnP format specifier dialog box

When importing a Pick and Place file, if the file format is not automatically recognized, you can specify the format as necessary.
Mark holes as press-fit
It is now possible to mark holes as press-fit. This is done by right-clicking on the appropriate tool(s) in the drill tool list, and selecting Via protection/Press-fit|Press-fit.
Laser cutter tool size for flex boards
For flex boards, it is possible to choose Laser as a cutter diameter. Note: Laser is only suitable for outer and inner contours.
Backdrill layers
Drill files may be assigned to backdrill layers.
Other improvements
New button bars in product browser
![]() A button bar above the folder list gives quick access to commonly used folders.
A button bar above the folder list gives quick access to commonly used folders.
![]() A button bar at the bottom of the product list gives quick access to commonly used product operations (found in the right-click menu).
A button bar at the bottom of the product list gives quick access to commonly used product operations (found in the right-click menu).
View list of active RFQs
Use the Operations|Active RFQs menu command to display a list of your active RFQs (if any). An RFQ may be created if you don't get an online price for a product.
Right-click on an RFQ and choose Cancel RFQ to cancel it.
Request interactive support
If you need help, an Elprint engineer can provide you with interactive support. Elprint uses TeamViewer technology, which allows the engineer to see your desktop and help you to quickly resolve your issue.
Click on the Interactive support button, which displays instructions for setting up a support session.
Note: Interactive support is only available for Elprint customers.
Macaos Enterprise 5.1 (January 2019)
Macaos Enterprise 5.1 (January 2019) BruceNew panel module features
Allow rout slots to cross scoring lines
Normally, rout slots end at scoring lines, in order to prevent notches in neighboring boards. This can lead to unwanted burrs or sharp corners at the routing/scoring interface. For symmetrical boards, the slot may cross the scoring line without entering the neighboring board.
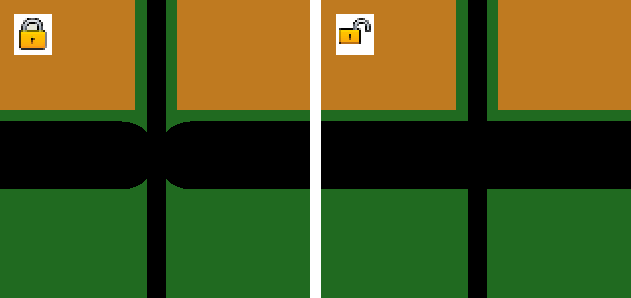
When scoring is enabled, a padlock is shown. Click on the padlock to "unlock" the routing/scoring interface. When scoring is "unlocked" then the routing slots extend one radius beyond the scoring line. It is the user's responsibility to insure that any notches which may arise within neighboring boards are acceptable.
IPC-2221 Z-style Impedance test coupon
An impedance test coupon may easily be added to the margin of a panel. The user need only specify the signal style, layer and trace width (and spacing). The coupon is then automatically generated according to the specifications for a Z-style test coupon in IPC-2221.
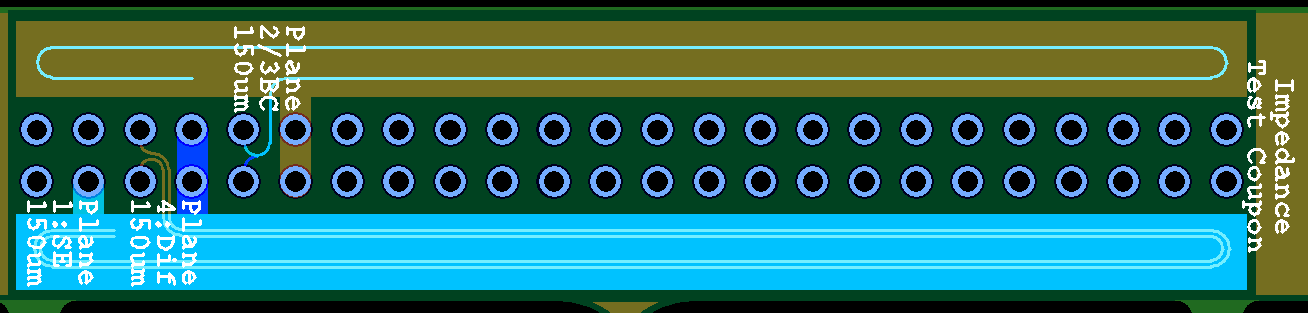
A test coupon may contain up to 12 signals, but no more than two signals on a layer. Single-ended striplines and microstrips, edge-coupled differential striplines, and edge-coupled or broadside-couple microstrips are supported.
See the test coupons help page for more info.
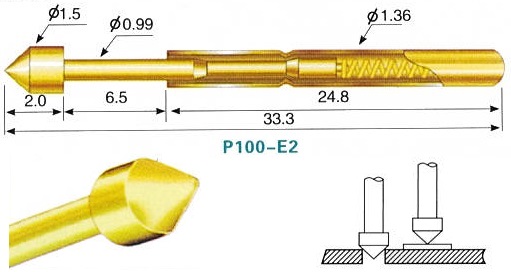
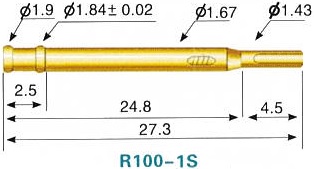
Test accessory catalog
A catalog of test accessories has been added to the Test Fixture module. The catalog lists all of the test pins, guide pins, test jigs and other test accessories available for purchase through Macaos Enterprise. Double-click on a product to see product specifications and drawings or photos.
Support for CircuitData language
The CircuitData language is an open language for communicating PCB specifications, requirements and capabilities. Macaos Enterprise supports both reading and generating PCB product specifications in CircuitData JSON format.
A CircuitData file may be imported in the Buy module, allowing you to get prices for a product without having imported the Gerber/Drill files to Macaos Enterprise.
A CircuitData file may be exported by right-clicking on a PCB product and choosing Download|Download CircuitData.org data.
See www.circuitdata.org for more information about the CircuitData language.
Other improvements
Search for products by customer's requisition number
In the Extended Product Search module, it is now possible to search for a product by requisition number.
RFQ to external supplier
If enabled, you may choose to send an RFQ to an external supplier. An e-mail containing your RFQ and product specifications is automatically generated and sent to the supplier, who should then respond with their quotation by e-mail. Note: The external supplier must subscribe to the Macaos RFQ service and then enable this feature for your company.
Prices from Gerber Job file
A Gerber Job file (.gbrjob) may be imported in the Buy module, allowing you to get prices for a product without having imported the Gerber/Drill files to Macaos Enterprise.
Macaos Enterprise 5.0 (October 2018)
Macaos Enterprise 5.0 (October 2018) Bruce
DepanelizationDepanelization is the process of removing individual boards from a panel, after the boards have been populated with components. Traditionally, boards have been depanelized by breaking or cutting the the break-off tabs which hold the panel together. However, the mechanical forces (particularly bending) which can take place may weaken or damage the solder joints of fine-pitch SMT components near the board edges. This problem can be mitigated by using a milling machine to remove the break-off tabs. The Depanelizer module allows you to easily and quickly accomplish the two specific tasks required for depanelization by milling machine:
|
Stackups with odd number of layersIt is now possible to define a multi-layer custom buildup with an odd number of copper layers. For example, to define a 3-layer buildup, start by defining a 4-layer buildup. Then, choose Omit as the copper thickness of one of the inner layers. |
Panelization improvementsIt is now possible to specify the outer dimensions of a panel. In this way, you can adjust the width of the outer frame to give the desired total panel width/height. The outer dimensions may only be adjusted after the Panelize operation has been executed. It is now possible to place tooling holes and fiducial marks relative to the center of the panel. When specifying the X/Y distances, you can choose whether the distance is measured from the panel corner or the panel center. |
Other improvementsLook and feelWe've given all modules a new look. Modules now have a more consistent layout, with parameters at the top left, info/help text at the lower left, and the graphical viewer's layer list to the right. Button bars across the top of each module give quick access to the most commonly used functions. The graphical viewer has several status panels along the bottom edge, which display useful information. Click on the view mode or units panel to change the view mode or unit of measure. Product variantIt is possible to change many more parameters of a PCB product when creating a variant of the product. Minimum copper to unplated edge clearancePressing the N key (with the mouse over the graphic viewer module while viewing a PCB product), highlights and zooms to the objects having the minimum distance between a copper feature and an unplated hole or contour edge. Connection managerThe connection manager has been expanded with Ping and DNS lookup functions, which can help when troubleshooting connection issues. |
Macaos Enterprise 4.5 (February 2018)
Macaos Enterprise 4.5 (February 2018) Bruce
Import module improvements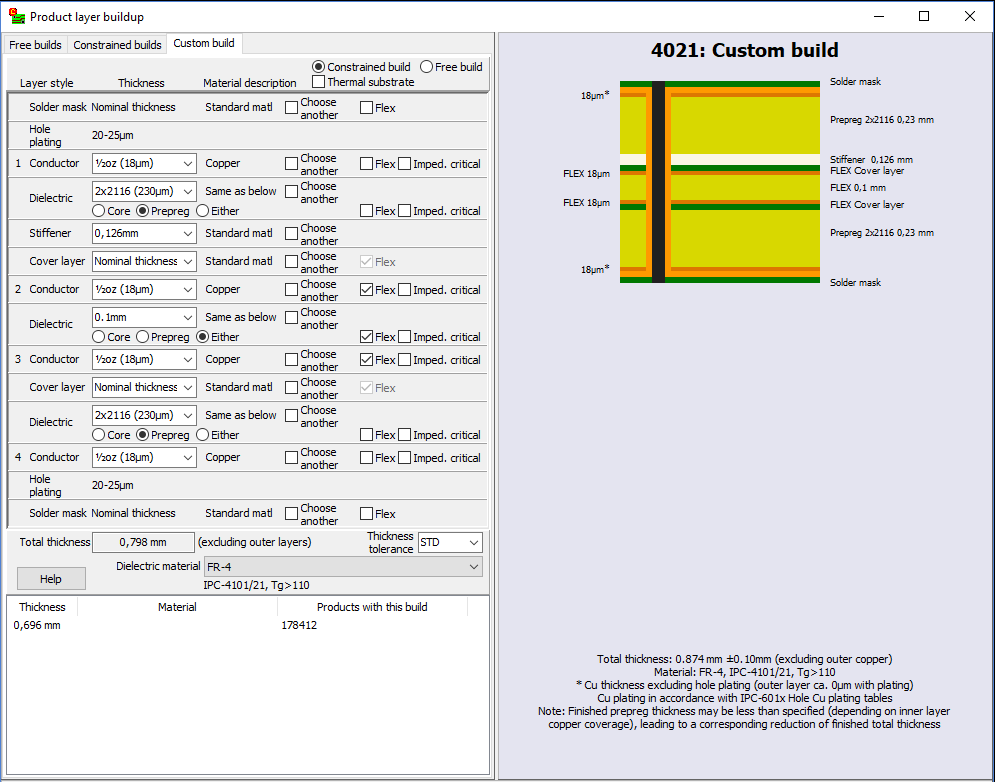
Expanded custom stackup definitionIn this version we have expanded the custom stackup definition module to better support flex and rigid-flex boards.
Refresh file during importIf while preparing a product for import, you discover that a layer needs to be updated, you can replace that layer without having to restart the entire import process. Right-click on the file name and choose Replace file. Note: It is not possible to replace the board/contour file. If this file needs to be updated then the entire product must be imported again. Gerber job fileIf the product you are importing contains a Gerber job file (*.gbrjob) then file linking information and product parameters will be extracted from the file. Note: The final format of the Gerber job file has not yet been published. Some Gerber job files may not be compatible with the current draft specification. We will update this feature when the final format is published. |
3D mechanical partsMechanical parts may now be specified with a selection of different materials and colors. An STL file is required for viewing the imported mechanical part, and may be used for manufacture of simpler parts in thermoplastic materials. For complex parts and parts with many curved surfaces, a STEP file should also be uploaded. You will be asked to upload the STEP file when you publish the part. |
Product browserSeveral new automatic folders have been added to the product browser, for single PCBs, panels, solder paste stencils, test fixtures, and purchased off-the-shelf products. This should make it easier to locate products. There are new browser options to hide empty or seldom used folders. Use the Tools|Options command to specify browser options. Browser columns have been added for surface finish, solder mask color and legend color. The icon in the "Buy" button shows the number of products in the shopping basket. |
|
|
Macaos Enterprise 4.4 (May 2017)
Macaos Enterprise 4.4 (May 2017) BruceTest fixture improvements
Macaos Standard Jig
This version supports the Macaos standard test jig. The Macaos standard test jig is designed to use a lower fixture box with an internal height of 70mm, giving room for connectors, wiring and electronics in an easily swappable module.
The Macaos standard jigs issupplied with an easily removable generic upper fixture allowing for flexible placement of press pins. An adjustment screw and magnet make it possible to finely adjust the spacing between upper and lower fixtures.
Static guide pin placement
It is now possible to place static (non-deflecting) guide pins at any location along the edge of the PCB. Static guide pins are useful for insuring proper placement of boards that do not have holes with an appropriate diameter for normal guide pins.
Specify or edit pin coordinates
It is now possible to modify the pin coordinates and/or hole diameter when placing a test pin. It is also possible to edit these values after a pin has been placed.
The coordinates and diameter of holes for guide/support/press pins may also be edited, by first right-clicking on the pin list and showing guide pins.
View opposite test fixture
When creating a test fixture for the opposite side of an existing test fixture, the "other" test fixture may be viewed.
Note: The "other" fixture data is not saved with the new fixture.
Import 3D mechanical part in STL format.
Three-dimensional data for mechanical parts may be imported. Only STL format may be imported.
Once a file has been loaded, it may viewed from any angle. The part size, weight, volume and surface area are also displayed.
Note: STL is a unit-less format. By default, STL files are assumed to be in mm. Buttons are provided for converting to other units, if necessary.
After publishing, the part may be purchased through the Macaos Enterprise quotation module.
Annotation fields
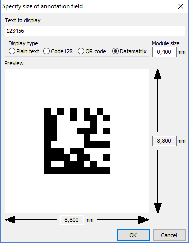
Annotation fields may be placed with an appropriate size for a text, bar code or 2-dimensional bar code. The define annotation field dialog box automatically calculates the size of a rectangle for the text or bar code for a specified number of digits or alphanumeric characters, including appropriate margins. This feature is useful for laser marking of date codes and/or serial numbers.
Annotation fields may be added to a new product in the Import module, or to a new panel in the Panel module. Annotation fields may also be added to an existing product with the Add Masks module.
Other new features
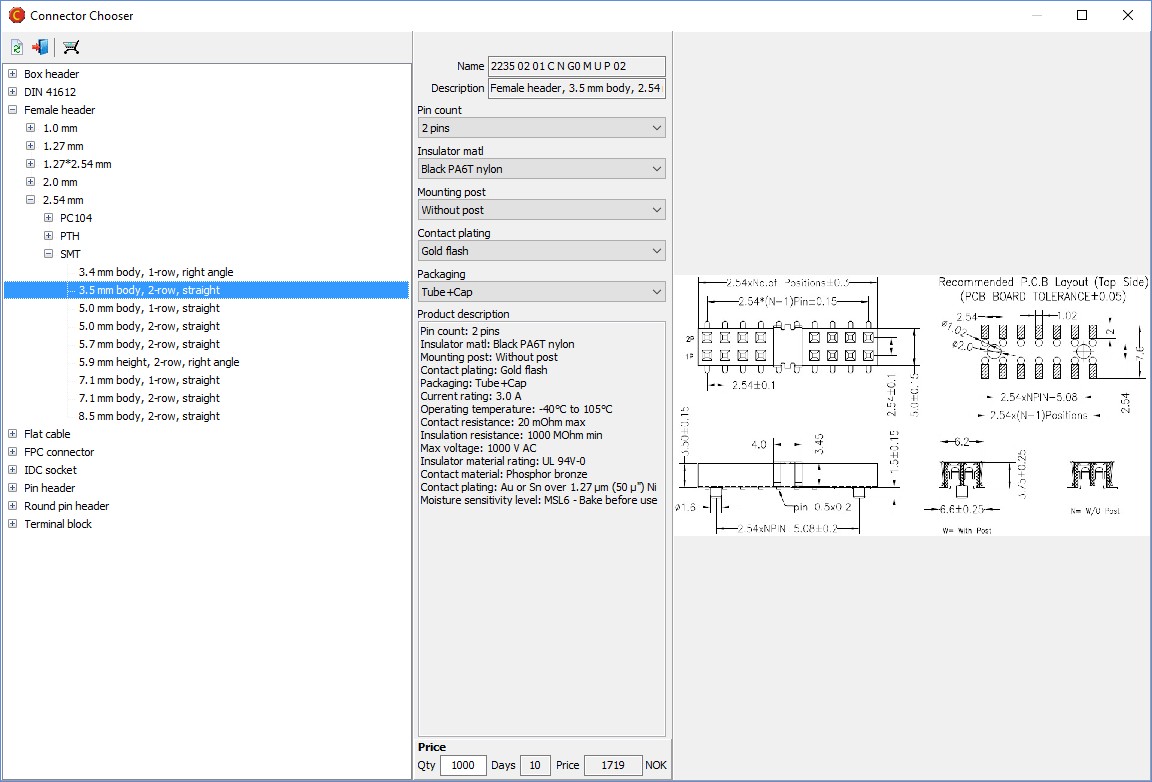
Prices in Connector Chooser
Where available, prices for connectors are shown in the Connector Chooser without needing to go to the Quotation Module. Prices update dynamically as connector properties are changed.
Cancel symbol placement
In the Import Module, when drawing or placing a symbol, right-click to cancel the operation.
Macaos Enterprise 4.3 (January 2017)
Macaos Enterprise 4.3 (January 2017) Bruce
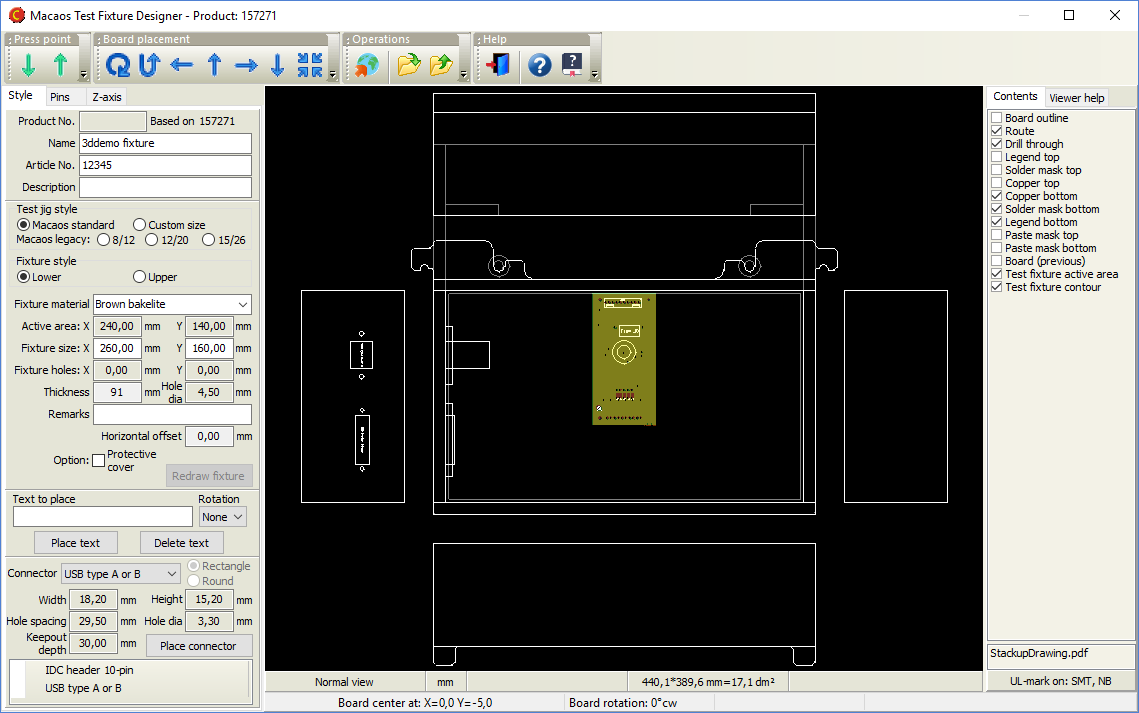
Test fixture improvementsFixture specificationWhen creating a test fixture, you may choose a fixture suitable for one of the Macaos test jigs, or specify your own dimensions.
Macaos test jigs are supplied with a generic upper fixture allowing for flexible placement of press pins. In case of more specific needs, an upper fixture may be designed by selecting the lower fixture and then opening the test fixture designer. Text may be placed on the fixture as desired. Text may be rotated in 90° increments. When a box-style fixture is designed, then connector openings may be placed in the box walls as desired. Choose from pre-defined connector sizes, or specify your own opening. Connectors may be deleted by right-clicking on the list of connectors. Pin placementWhen placing pins you may choose a Macaos pin style, or specify your own hole diameter. Test pins must be placed on pads or holes. Guide pins must be placed on holes. Press pins and support pins may be placed at any location. When placing test pins, if more than one pad/hole is selected, the pin will be placed at the center of the selected pads/holes.
|
Quotation and order placement improvementsThe visual appearance of the quotation module has been changed somewhat. Check boxes for quantities and lead times have been moved to the left and top edges of the price grid. An expanded price engine allows for more flexible calculation of prices for a wider variety of product types and parameters. Discounts are automatically calculated when certain products are ordered for delivery together. If no price is available, it is still possible to place an order. You will be asked to confirm the price and delivery before the order is set in production. |
Import module improvementsContour specificationDepth routing: When specifying inner contours or track routing, a routing depth from the top or bottom side of the board may be specified. Quick contour selection: Press the "Q" selection button to create a contour object from a selection rectangle. This is a quick way to define a rectangular outer contour in cases where only corner marks have been provided. Select pads: Pads may be selected to define slots by holding down the Ctrl key while selecting. It is not possible to select pads and lines in the same operation. Minimum features warningWhen publishing, a warning will be generated if the estimated minimum features are less than the warning threshold. This threshold may be set in the Edit|Options dialog box. Ferrite layersFerrite Top and Ferrite Bottom have been defined for use with sheets of ferrite material to be added to a PCB. Proteus link filterAn additional link filter has been added for use with newer versions of Proteus. |
Stencil module improvementsAdjust stencil opening size by height and/or widthOpenings may be adjusted by a percentage of their height and/or width (instead of or in addition to adjusting them by a percentage of their area). Stencil typesA number of additional stencil types (for licensed frame patterns, etc) have been added. Stencil optionsOptions for polished hole walls, coating of hole walls and protecting/strengthening stencil edges have been added. |
Other new featuresViewer: Rotation/mirror statusA status bar at the bottom of the product viewer indicates if the view has been rotated or mirrored. Login: Manage multiple passwordsThe File|Manage multiple passwords command opens a list of the login-name/password combinations you have used. Set a check mark by those you wish to delete and then click the OK button to delete them. Note: Multiple passwords are only stored if the File|Remember multiple passwords function is activated. |
 The fixture designer supports two kinds of lower fixtures:
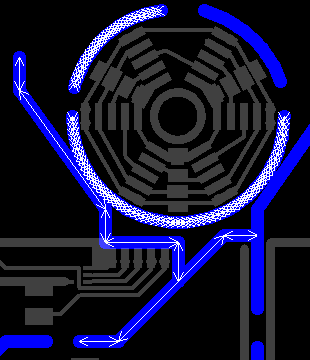
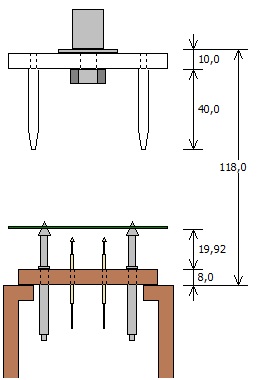 Z-axis visualizer
Macaos Enterprise 4.2 (June 2016)
Macaos Enterprise 4.2 (June 2016) Bruce
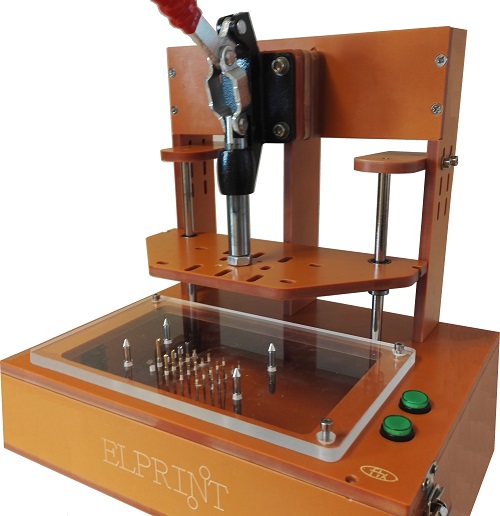
"Bed of Nails" test fixture creation
A "bed of nails" test jig is used for in-circuit testing of a PCB with components. Typically, the jig consists of a bottom fixture with many spring-loaded test pins (pogopins) that are placed to make contact with test points on the PCB. An upper fixture presses the board onto the bed of nails so that all of the pins make good contact. A test program may then be run to confirm the operation of the PCB. A test fixture is a plastic plate with holes drilled at each of the test point positions. Each test point hole will have a base (or receptacle) mounted in it. For each receptacle diameter, a spring-loaded pin head is inserted. You may choose from several different pin head styles, depending on the type of test point the pin will contact.
Test fixture creator moduleOpen a PCB product in the test fixture creator module and specify the parameters of the fixture plate. Then click on holes to place alignment pins, and click on holes or pads to place test pins. Once all pins have been placed, adjust the position of the press point and then center the PCB under the press point. The published test fixture product includes a drill file for the fixture plate and wiring list documentation. Top side fixtureIdeally, all of the test points should be on the bottom side of the PCB. However, if necessary, a top side fixture may also be created. If a test fixture already exists for a PCB, then you may choose to use that fixture to specify the placement of the PCB in the new fixture. Test accessoriesThe Test accessories folder in the product browser lists test jigs, test pins and related accessories available for purchase. |
"Off the shelf" productsMacaos Enterprise now supports ordering off-the-shelf products, such as test accessories, stencil frames, connectors, software, etc. These products may be purchased in the same manner as your PCB and stencil products. Not all products have prices available online. In cases where the price is not available, you will be notified of price and availability and asked to confirm your purchase before the order will be processed. |
Connectors
Macaos Enterprise supports a wide variety of connector types, each with multiple options. The Connector Chooser module helps you to browse through the possibilities and select the appropriate connector. Only connectors which your organization has previously purchased are listed in the Connectors folder, making it easier for you to find the same connector again. |
Other new featuresProduct Browser: Folder iconsStandard folders now have icons, to make them easier to locate in the folder list. Product Browser: Stackup number columnA stackup number column has been added to the product browser. Use the View|Show/Hide columns|Product stackup menu command to view this column. Viewer: Lock cursor to axisPress Alt+X or Alt-Y to lock the cursor position to the current X or Y coordinate. Press Esc to release the lock. Move Macaos Enterprise to a new PCUse the Tools|Move Macaos Enterprise to new PC command to copy all Macaos Enterprise program and settings files to a flash drive (or other storage location). These files may then be copied to the desired program folder on a new PC. When you start Macaos Enterprise on the new PC, the settings files will be relocated to the appropriate folder. |
Macaos Enterprise 4.1 (March 2016)
Macaos Enterprise 4.1 (March 2016) Bruce
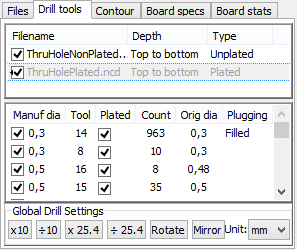
Product Browser ImprovementsNew product specifications and statisticsNumerous product parameters have been added to the Macaos system. This will improve online pricing and quality control. See the Import Module section (below) for a complete list. Specify time interval for "Recent" foldersThe time interval (in weeks) for a product to be included in the Recent Orders, Shipped Orders or Recently Published folders may be specified in the Tools|Options dialog box. Product sharesIf a product is shared, the product share information is shown at the bottom of the Product Specifications column. The Shares context (right-click) menu has been restructured to make share management easier. Drill tool listFor PCB products, a complete drill tool list is shown together with the product specifications and stackup diagram. Video tutorialsVideo tutorials for using Macaos Enterprise may be found with the Help|YouTube video tutorials menu command New viewer functions
|
Order placement improvementsOrder packaging optionsTwo packaging options have been added to the Macaos system.
Place textAllow text on notation layers to be placed within boards in a panel Quotation quantitiesWhen getting price quotes or placing orders for panels, the order quantity is always the number of panels. But it is now possible to specify number of boards, which will automatically be converted to number of panels in the price grid |
Import module improvementsNew product specifications:
New product statistics:
Product options
New viewer functions
Custom stackup definition
Alignment of pick and place filesWhen aligning pick and place files, only the visible layer(s) will be moved. In this way, it is possible to make separate adjustments for top and bottom sides. |
Panelization improvementsPlace textAllow text on notation layers to be placed within boards in a panel Graphical remarksAdd graphical remarks to a panel. |
Stencil improvementsShow potential errorsThe stencil creator checks for stencil openings that do not appear to be consistent with the original stencil data. This could be due to the original openings having been reduced by the board designer, or because the stencil creator was not able to locate the correct reference pad on the copper layer. If potential errors are found, they can be highlighted for inspection. Automatic fiducial detectionIf the stencil data contains objects that appear to be fiducials, these are automatically detected and can be easily marked as fiducial or deleted. The same is true for stencil fiducials in a panel frame defined in the panel module. Edit/split rotated shapesThe pad shape editor now works on shapes with any rotation factor. Transfer objects from any layerIt is possible to copy objects from any layer to a stencil layer. |
Assembly Data ManagerThe Quick Help button opens a web page with step-by-step guidelines for generating an RFQ for Assembly. Bill of Materials (BOM)Before processing, a hint window reminds the user to specify column headers. After processing, the rows of the output BOM are green if a single match is found, or yellow if multiple product matches are found. Pick and Place Data Export(Available only in Pro version for participating EMS providers)Specify column order, coordinate units and separator character when exporting PnP data. May include part number and package footprint from BOM. |
Macaos Enterprise 4.0 (July 2014)
Macaos Enterprise 4.0 (July 2014) Bruce
Assembly Data ManagerThe new Assembly Data Manager Module allows you and your partners to work with component purchasing and placement data for a PCB. Once suitable Pick and Place data and a Bill of Materials have been provided, then it is possible to send a request for quotation to the Electronics Manufacturing Services providers of your choice. You may also create and modify graphical remarks for a product. Pick and Place Data (PnP)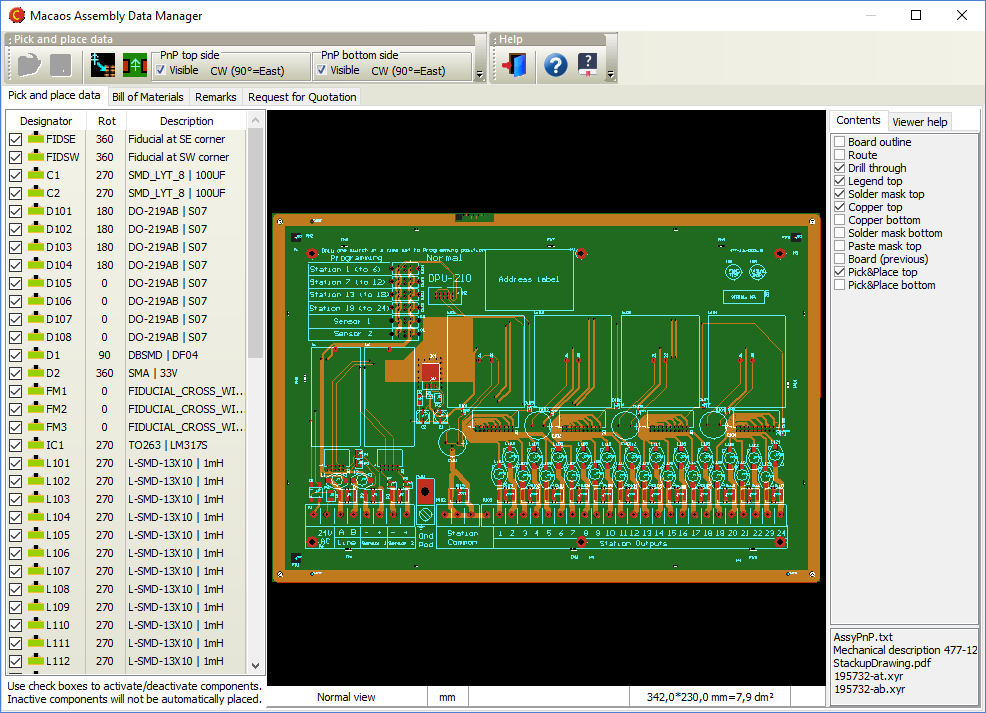
PnP data specifies the designator, location and rotation of components that will be automatically placed for (usually) reflow solderinig. There are, unfortunately, a multitude of different PnP data formats. Macaos Enterprise is able to read more than a dozen of these formats. (See the user manual for details about the most common formats supported.) With the Assembly Data Manager, you can do the following:
Bill of Materials (BOM)A BOM is a list of the components that are to be used with the printed circuit board. The BOM is used to select and purchase the correct components as well as to specify where each component should be placed on the printed circuit board. In many cases, a BOM contains component descriptions that require some interpretation by the purchaser, due to inconsistent or incomplete specifications. The Assembly Data Manager attempts to improve the usability of the BOM by applying a number of parameter recognition techniques and attempting to match components in the user's BOM to a database of known components. The procedure is as follows:
Graphical remarks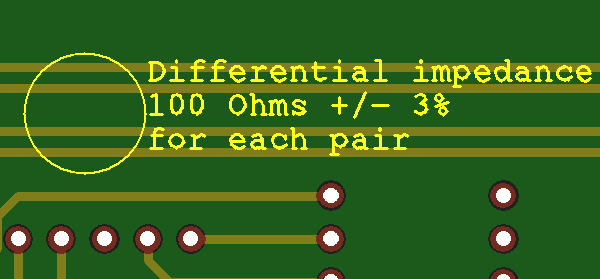
Graphical remarks may be added to any product. Existing graphical remarks may be deleted or replaced, if desired. A remark may be created as follows:
To delete a remark, click on the Delete button and draw a selection rectangle around the entire remark. If you need to change the text of a remark, you can click on the Edit button and change a single line of text at a time. Note: This can only be done with remarks created during the current session. For older remarks, you must delete and re-create the remark. Request for Quotation (RFQ)Once you have processed your PnP data and BOM, you can send a Request for Quotation (RFQ) to an Electronics Manufacturing Services (EMS) provider. The RFQ module in the Assembly Data Manager provides a simple checklist for creating an RFQ. Once you send an RFQ, the EMS provider will be notified that all of the data they need is available to them in Macaos Enterprise. |
Stencil improvements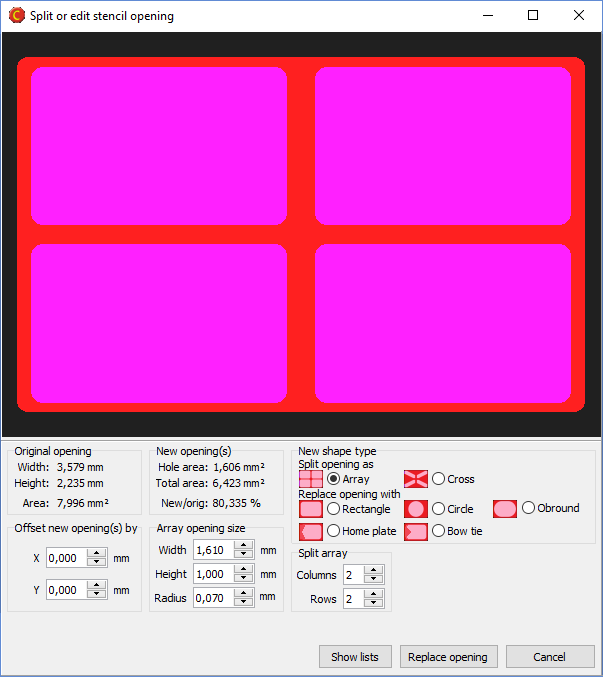
Split/replace openingsThe module for splitting a large stencil opening into an array of smaller openings has been improved. It is now possible to choose between several split patterns or replacement opening shapes. You have full control over the size and shape of the new opening(s), as well as statistics to indicate how the change will affect total solder delivery. Although this feature is primarily intended for working with large (heat sink) openings, it may be used to modify the shape of any opening in the stencil. Highlight large padsThis feature allows you to easily locate stencil openings whose height and width are larger than the size you specify. This way you can quickly find opening that should be split. Place board data relative to frame edge or frame centerIt is now possible to specify the position of the board relative to the edge of the stencil frame, or relative to the center of the frame. Top and bottom side data may be offset horizontally or vertically, as desired. Mirror bottom side dataBottom side data is automatically mirrored, so that the squeegee side of the stencil will always be the top side of the stencil. |
Import module improvementsSupport for up to 30 copper layersMacaos Enterprise now supports boards with up to 30 copper layers. This is an increase from the previous limit of 22 copper layers. Full support for the latest Extended Gerber format (Gerber X2)A new version of the Extended Gerber file format was released in the spring of 2014. This version adds a structure for identifying the file format version, board layer or function of the file, and classes of features within the file. Macaos Enterprise fully supports reading and interpreting these extensions. Support for Pick and Place files generated by CadstarPick and place files generated by Cadstar may now be imported, either in the Import Module or in the Assembly Data Manager. |
Panelization improvementsPlace tabs in lineWhen placing break-off tabs on a panel, if you click and drag the mouse then a horizontal or vertical line is shown. When you release the mouse, a break-off tab will be placed at each point where the line crosses a board edge. Panel drawing improvementsA table in the upper left corner of the panel drawing specifies the size of fiducials and bad marks. For a single-product panel, this table also specifies the X and Y step distance of the boards in the panel. Product chooser improvements for multi-product panelsWhen working with multi-product panels, the product chooser now displays the number of boards in the panel for each product in the list. You can also right-click on a product to view the product and its specifications. The product list now includes a filter function (at the bottom of the list) to aid in locating products. |
Macaos Enterprise 3.8 (December 2013)
Macaos Enterprise 3.8 (December 2013) Bruce
Import module improvementsPlace a text string on the PCBA text string may be placed on a notation layer of the PCB as follows:
Add IPC/JEDEC J-STD-609A compliant marking to the PCB
The IPC/JEDEC J-STD-609A stanard defines how PCBs should be marked to identify the the presence (or absence) of lead and/or other attributes in a PCB or PCB assembly. The import module includes a simple dialog box where you can create a compliant text string and add it to a PCB by answering up to 6 questions about the laminate material, surface finish and (optionally) the required assembly processes. Once the text string has been generated, it may be placed at any location on the notation layer of the PCB. While in Add text mode, click on the J-STD-609A button to open the dialog box. Select the appropriate parameters for the text string, and then click OK. Place the text string as described above. Add remarks to the PCB graphically
You can add remarks to a PCB at a specific location. This is useful when a remark is tied to some feature or location of the PCB. A remark may be created as follows:
Remarks are added to the Remarks layer. A circle will be drawn around the selected feature(s) and the remark text placed to the right of the circle. Via protection (plugging, filling, etc) |
Panelization improvementsFlip board in panelAn individual board in a panel may be flipped upside-down. When a board is flipped, it is mirrored and all of its layers are swapped from top to bottom (and vice versa). This is useful when creating a panel where it is desirable to use the same solder paste stencil for both sides of the panel, or when necessary to improve the copper balance of the panel. To flip a board, press Shift+Space while the mouse cursor is above the board to be flipped. (The board does not need to be selected. Clear zone for fiducialsThe clear zone around a fiducial mark may be specified as the diameter or width of a circle or square (depending on the soldermask shape). When copper fill is selected for outer layers, then the copper fill will be removed from the clear zone of each fiducial. Pull scoring line back from panel edges |
Stencil improvementsDefine reduced thickness region based on objects from any layerWhen defining a reduced thickness region based on selected objects, the objects may be selected from any layer. The reduced thickness region may either be a rectangle surrounding the selected objects, or may follow the shape(s) of the selected objects plus an "oversize" dimension. |
Viewer improvementsView from belowPress the M key to toggle the view between view from above and view from below. When viewed from below, the board is mirrored and only the bottom side layers are visible. This is useful if you wish to see what the bottom side of the product will look like. Rotate viewPress the R key to toggle the view between unrotated and rotated by 90 degrees. This is useful when viewing a tall, narrow board to make it fit better into the available screen space. Screen dumpPress Ctrl+V to copy the product viewer image to the clipboard. Press Ctrl+Shift+V to save the product viewer image as a file in PNG (Portable Network Graphics) format. Padstack detailsPress Ctrl+Alt and click on a drill hole to display a list of hole and pad diameters. |
Other changesRecently published folderA new standard folder has been added to the product browser. The Recently published folder lists all products which have been published within the past month. Filter order history and statisticsThe order history viewer, accessible with the Tools|Order history menu command, may be filtered to show statistics for a single product or for a selected time frame. Upload certification documentsIf you wish, you may upload documentation about yourself to the server. Typically, this would be done by a PCB designer who wishes to attach their professional certificates (such as an IPC CID+ certificate) to the products which they have designed. Your uploaded documents may be viewed when viewing the product history for any product that you have published. To upload a document, choose the Tools|Upload certification document menu command, and select the file you wish to upload. You may upload more than one file (but only one at a time). |
Macaos Enterprise 3.7 (March 2013)
Macaos Enterprise 3.7 (March 2013) Bruce
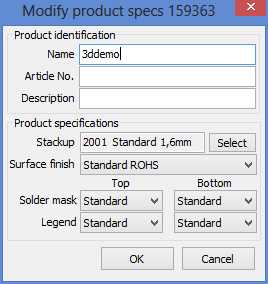
Product browser improvementsModify product specifications |
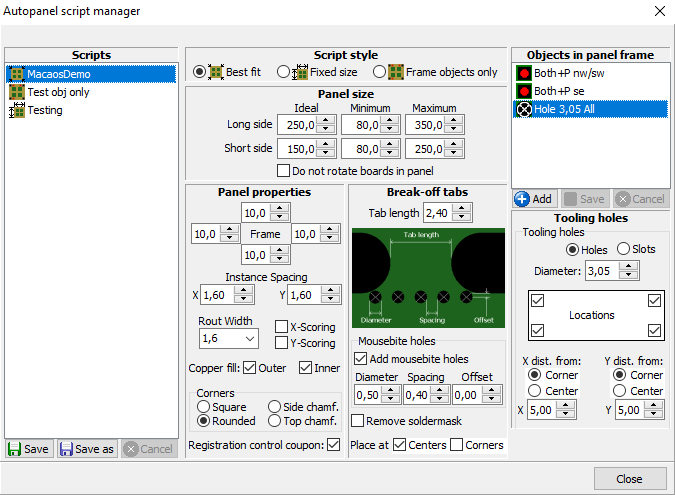
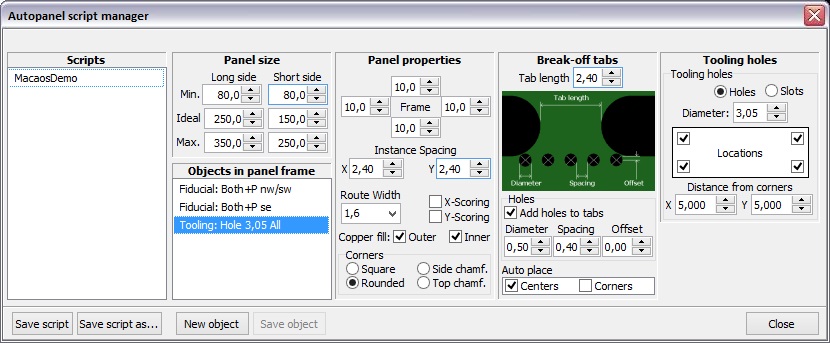
Panelization improvementsAutomatic panelizationPanels may be automatically generated from scripts. A script specifies an ideal panel size, as well as maximum and minimum dimensions. The automatic panel generator steps the board as close as feasible to the ideal size. A script may also specify panel parameters such as frame width, corners, copper fill, routing or scoring, break-off tab style, bad marks and break-off holes. In addition, any number of fiducials, tooling holes or slots and annotation fields may be added to the panel frame. The Autopanel menu lists the available panelization scripts. Clicking on a script name in the menu runs the script and generates the panel.
Scripts may be created or modified in the panelization module's script manager, accessed by the Autopanel|Script manager menu command. It is also possible to download scripts that have been created by EMS providers and import them into the script manager. Right-click on the list of scripts and choose Downloadable scripts to open the download site in your web browser. Scoring in multi-product panelsScoring may be selected for a multi-product panel. This is only possible if all of the boards in each row (or column) of a panel have the same height (or width). It is not possible to select or move boards once scoring has been specified. Therefore, all boards should be placed prior to selecting X-scoring or Y-scoring. Break-off holesThe break-off hole generator has been improved to better follow the contour of each board in the panel. Alignment linesWhen moving boards within a panel, vertical and/or horizontal lines show when the board is aligned with the edge(s) of other boards i the panel. 2-dimensional barcodes (Data Matrix ECC 200)A Data Matrix 2-D bar code may be added to the frame of a panel. Registration control couponA registration control coupon may be added to the frame of a panel. The coupon has a combination of thin lines and plated holes, for use with cross-section or registration testing of the finished panel. The product number is encoded as a Data Matrix at either end of the coupon. Rotate a board in a panel with scoringA board in a panel with scoring may be rotated 180 degrees by pressing the space key while the mouse cursor is above the board to rotate. |
Import module improvementsImproved linking of files to layersThe import module incorporates a new functionality for automatically linking files to their corresponding layers. This approach uses a simplified artificial intelligence engine to analyze all filenames together with the contents of text files (if any) and assign the files to layers. This approach is most useful for users who import files from multiple sources. The link filters functionality is also still available for use. This approach is more suitable for users who import files from only one or two CAD systems. A new Autolink menu has been added to ease switching between the autolink modes. Import board specifications from an existing productThe board specifications and mimimum feature sizes may be imported from an existing product and used when publishing a new product. Use the Edit|Import board specs from existing product menu command, and enter the product number. Be sure to edit any specifications that are not identical to the existing product, especially the board name. This feature is especially useful when importing a new product that is a revision of an existing product. Let contour follow inside of linesIf the lines that describe an outer contour are larger than 0.6 mm, then the user may choose whether the center of the lines or the inner edge of the lines will be used to define the board contour. 2-dimensional barcodes (Data Matrix ECC 200)A Data Matrix 2-D bar code may be added to a board. |
Stencil module improvementsAutomatic stencil creationStencils may be automatically generated from scripts. A script specifies the stencil frame and thickness, placement of data in the stencil, detection of fiducial and default reduction of openings. The autostencil menu lists the available scripts. Clicking on a script name in the menu runs the script and generates the stencil. Additional modifications may be made as necessary before publishing the stencil. Scripts may be created or modified in the stencil module's script manager, accessed by the Autostencil|Script manager menu command. It is also possible to download scripts that have been created by EMS providers and import them into the script manager. Right-click on the list of scripts and choose Downloadable scripts to open the download site in your web browser. If a panel is generated from a panel script and a stencil script with the same name exists, then a stencil may be automatically created immediately after publishing the panel. Problem report facilityThe problem report facility has been added to the Stencil module, under the Help menu. |
Viewer improvementsSnap to feature when measuringWhen making measurements, you can press the X key to snap the cursor to the nearest object endpoint. The procedure is as follows:
An object endpoint is the start or endpoint of a line or arc, the center point of a hole or pad, or any vertex of a polygon. Note that some CAD systems create what may appear to be a pad or polygon as a set of lines and arcs. In this case, the cursor will snap to the line or arc endpoint. |
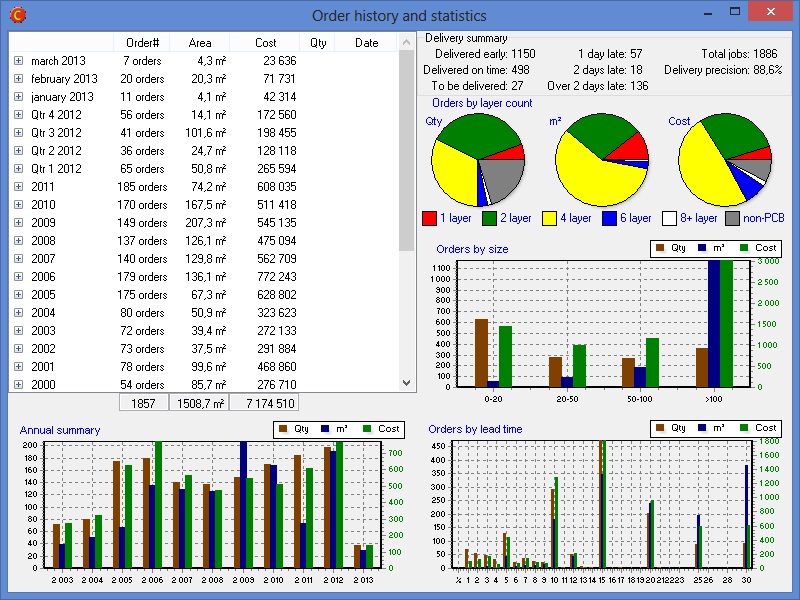
Other changesView order history and statisticsUse the Tools|Order history menu command to open the order history and statistics summary for your company.
Pro versionAll functionality that was previously reserved for users with Pro licenses is now available for all users. There is no "pro version" of Macaos Enterprise release 3.7. User manualThere are no longer separate user manuals for the import and panelization modules. All information is contained in one user manual, which may be opened from the Help menu in the product browser, import module or panelization module. What's newUse the Help|What's new in this version menu command to open this web page. |
Macaos Enterprise 3.6 (March 2012)
Macaos Enterprise 3.6 (March 2012) Bruce
Print a documentation setGenerate a PDF document with technical drawings of each layer in a PCB or paste mask product. A stackup drawing and drill template drawings are also included. The title block texts (such as owner, title, date and drawing number) for the document may be specified as desired. |
Panelization improvementsScoring in multi-product panelsScoring may be selected for a multi-product panel. This is only possible if all of the boards in each row (or column) of a panel have the same height (or width). Break-off holesThe break-off hole generator has been improved to better follow the contour of each board in the panel. Alignment linesWhen moving boards within a panel, vertical and/or horizontal lines show when the board is aligned with the edge(s) of other boards i the panel. |
Macaos Enterprise 3.5 (December 2011)
Macaos Enterprise 3.5 (December 2011) Bruce
Import module improvementsAutomation improvements when importing filesWe have made a number of changes further automate the import process. Automated drill file scalingIn many cases, the drill files will automatically be scaled to match the scale of the Gerber files. Boards with very few drill holes, or where only a small portion of the board has drill holes, may not be scaled automatically. Automated contour selectionOuter and inner contours are automatically detected/created in many cases. Track routing and scoring must still be specified manually. Note: If the Gerber file for the board layer contains a drawing frame or title block, then contours will not be automatically detected. Unpack .rar filesCompressed archives in rar format can be opened in the same manner as zip files. Link filter sharingUser defined link filters are stored online, so that they may be shared with other users in your company. We are also constantly looking at ways to improve and expand the link filters built into the system. Paste drill tool specifications into the tool list |
Improved stackup drawing |
Panelization improvementsStackup drawingA product stackup drawing is automatically generated when a panel is published. If the panel has blind or buried vias, these are shown in the stackup drawing. The product stackup drawing may be viewed or printed from the Macaos Enterprise product viewer. Available only with pro license Macaos Pro users have the option of entering their own text into the various fields of the title block. This feature applies both to the panel drawing and the product stackup drawing. In this manner technical drawings for project documentation may be easily created, with title, drawing number, revision, etc. in accordance with the requirements of your organization. Default panel settingsWith the Tools|Settings menu command, you can choose between specifying the default panelization settings at program startup, or automatically remembering the specifications used last time the program was run. |
Other improvementsRequest a quotation for assembly of a PCB |
Commit order dialog box |


Macaos Enterprise 3.4 (December 2010)
Macaos Enterprise 3.4 (December 2010) Bruce
Panelization module improvementsMulti-product panels
Select a board in the product browser and open the panelization module. Press Ctrl+R to open the product chooser, which lists all board products that match the stackup (or number of layers) and finish/colors (if selected) of the first product. Drag a product from the product list into the panel to add the board to the panel. Move the board to the desired location and click to place the board. All boards should be placed on the panel before adding tabs, fiducials, drill holes, etc. If no tabs are added to the panel, then the boards will be delivered as individual boards. Move and rotate boards within a panelAny board in a panel may be moved or rotated as desired. Draw a selection rectangle over part of a board's contour to select the board. The board will move with the mouse, but will automatically snap to align with the edges of neighboring boards. Press Ctrl to disable snap. Press the space bar to rotate 90 degrees. Click to place the board into the panel. Add assembly masks to a panel |
Import module improvements |
Fiducial marks at specified coordinates.Fiducials may be added to a board at specified coordinates by pressing Ctrl+Alt and then clicking on the board. |
Stencil module improvements |
Product browser improvementsAdd assembly masks to existing productsAvailable only with pro license Add data for peel-off mask (blue mask), paste mask, glue mask, carbon or hard gold to an existing product by selecting the product and clicking the Add masks button. Assembly mask data is added in the same manner as for panels (described above). |
Standard foldersFour new standard folders have been added to the product browser.
|
Product searchIt is now possible to choose between "begins with", "ends with", "equals" and "contains" when searching for a product. |
Product historyA new progress indicator shows the status of active orders. |
 In many cases, it may be desirable to put several different boards together into a panel. For example, by putting the different boards in a system together into a panel, it would be possible to order one panel per system. Often, the price of a multi-product panel will be substantially lower than the price of the same quantity of boards ordered individually.

Macaos Enterprise 3.3 (March 2010)
Macaos Enterprise 3.3 (March 2010) Bruce
Import module improvementsMore silkscreen symbols
Add ESD-susceptibliity and RoHs symbols to the component legend or solder mask layer of your board. You can also add an annotation field (a filled rectangle) for adding serial numbers or other handwritten information. |
Bar code
Add a bar code to the component legend layer of your board. Bar codes are generated in standard Code128-B format. |
Define custom stackups
Specify custom layer buildups in detail with the new custom build definition module in the stackup selection dialog box. Or choose one of your previously defined custom stackups. Right-click on the stackup viewer to open a detailed stackup diagram in PDF format. Fiducial marksAdd fiducial marks to your board. If Pick and place data or paste mask data exist, then fiducials are added to those layers as well. New autolink filtersPre-defined autolink filters have been added for Proteus and CADint 4.x |
Panelization module improvementsBar code
Add a bar code to the component legend layer of the panel frame. Bar codes are generated in standard Code128-B format. |
Annotation fieldAdd an annotation field (a filled rectangle) for adding serial numbers or other handwritten information to the frame of a panel. |
Stencil module improvementsImproved shape manipulationsSelect and highlight objects before adjusting them. Select all objects having the same size/shape. Shapes adjustments are made relative to the size of the corresponding copper pad. Corner rounding may be specified. |
Objects may be deletedSelect and delete unwanted objects from the stencil data. Delete unused frames from the frame manager. |
Product browser improvementsProduct browser columnsTwo new configurable columns (Article and Description) have been added to the product browser. Use Show/hide columns in the View menu to turn them on or off. |
Product infoRight-click on the stackup viewer to open a detailed stackup diagram in PDF format or to copy a simple stackup diagram to the clipboard in text format. Product viewerAdd documentation files to a product. Right-click on the file list (below the layer list) to add a file to the product. This feature is intended for keeping component assembly documentation together with the product. (Note: Documents added to a product after an order has been placed will not necessarily be used by the manufacturer.) If a product contains a UL-mark, this is indicated with a text just above the cursor coordinates. Product historyAn expected shipment date column has been added to the product history view. |
Macaos Enterprise 3.2 (December 2009)
Macaos Enterprise 3.2 (December 2009) Bruce
Stencil Product Creator
|
Pick and Place data |
More silkscreen symbols |
Improved product searchingThe product search dialog now lists the names of folders where the product may be found. You may now assign your own article and description to products which have been shared to you by partners. This should make it easier to organize and locate partner products. |
Autolink filter for ProteusA pre-defined link filter has been added for Proteus files. You may need to open the link filter manager (Edit|Link filters) to enable the new filter. |
Rounded corners on panelsWhen panelizing a product, it is possible to specify that the corners of the panel frame should be rounded. This makes it easier to load panels into processing machines. |


Macaos Enterprise 3.1 (October 2009)
Macaos Enterprise 3.1 (October 2009) Bruce
New panelization featuresThree new features have been added to the Panelization Module:
|
Silkscreen symbols |
Complex Contour Editor
|


Macaos Enterprise 3.0 (July 2009)
Macaos Enterprise 3.0 (July 2009) Bruce
Panelization Module
|
New viewer featuresCursor coordinates and board size are displayed at the bottom of the layer list. Left-click and drag to measure distances in the viewer. |
New import featuresSupport has been added to the Import Module for the following:
|
